Hurricane Sandy hammered the mid-Atlantic region starting October
29, 2012. It was a terrible storm, and even now, approaching
mid-November, areas hardest hit are still experiencing hardships.
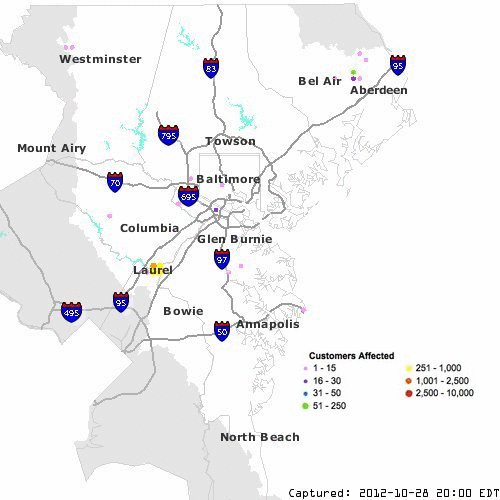
Having dealt with many past BG&E power outages, most recently five
days without power due to the June 2012 Derecho, I regularly
capture their outage (bit) map for my own records. The derecho
also motivated me to capture Dominion Electric VA’s outage map
regularly for comparison. Here are examples for BG&E and Dominion
VA for October 29, 2012 as Sandy made landfall:
(right-click and view image for
full image; more loops here)
Loops are available here for October 29 through November 3, 2012.
The README.md contains some description and direct links to the raw
gifs.
Luckily, my area maintained power all through Sandy’s attack. Time for
a transfer switch, a portable power generator, and a fuel
stock for the next unplanned outage.
Best wishes to those in NY and NJ for relief and restoration of
services.
was the over-writing of all my custom sass, e.g., styles, etc. This
seems a little unnecessary, since it’s already labeled custom. Why not
leave it, or move it out of the main theme, so it’s not stomped on theme
switch. If your custom changes mess-up the theme, that should be up to
you to fix. Nuking things is never a good idea, unless we’re talking
microwave.
If you are a Mac and $\TeX$ user, you are likely a MacTeX user. If
you’ve been using it for a while, you have probably accumulated a fair
number of versions, since it is on a roughly yearly release cycle. To
remove the cruft before installing a new release, I’ve taken to removing
the old installation. If you’ve tried this, you may have looked at the
uninstall instructions, e.g. for 2011, and found them to be, well,
somewhat lacking, e.g. stackexchange. The last part, where the
instructions suggest using Show Files from the installer, not
particularly useful, given the number of files involved, and the fact
there didn’t seem to be a way (on 10.7.4) to export the file list.
What’s installed
Like the uninstall procedure expects, you’ll need access to the 2011
MacTeX.mpkg.zip file. Make a directory and unzip the file
Decompress the old installer package
123
$ mkdir cleanup
$ cd cleanup
$ unzip /path/to/MacTeX.mpkg.zip
which could create a MacTeX.mpkg directory in your pwd. Now you can
build a table of contents from the archives included, assuming bash
Generate TOC
123
for a in $(find MacTeX.mpkg -name Archive.pax.gz); dopax -zvf $a | awk '{print $9}' | sed -e 's/^.//'done > mactex.toc
Relax, it may take some time, on the order of a minute or two.
Dirs and files
From the toc, the files and dirs can be separated. We know two
directories whose individual files and sub-directories will be removed
wholesale
Complete directory trees to be removed
12
/Applications/TeX
/usr/local/texlive/2011
These trees are filtered from the toc to reduce the noise in the output.
A small script will test if a line is a directory (-d) or a regular
file (-f)
getem.sh: Filter toc for remaining files or dirs
1234567891011121314151617
#!/bin/bashI='mactex-2011-toc.txt'P=(\"^\/usr\/local\/texlive\/2011\/.+$"\"^\/Applications\/TeX\/.+$"\)case"$1" in
-d)O='mdirs.txt';;
-f)O='mfiles.txt';;
*)echo"usage: getem.sh [-d|-f]"; exit 1;;
esacfor l in $(sed -E -e "/${P[0]}|${P[1]}/d" < $I); dotest"$1""$l"&&echo"$l"done | sort -u > $O
The P var holds the sed patterns to filter everything below the tree
heads identified above. For my install, the directories output were
So, in addition to the two trees we already expected to prune, the
additional installed ImageMagick and ghostscript dirs will be
removed. These were removed by invoking
Remove the realistic dirs
1
$ cat mdirs-short.txt | xargs sudo rm -rf
where sudo is necessary, as it was installed as root. On to the
files, like removing the dirs, invoke
Removing remaining files
1
$ cat mfiles.txt | xargs sudo rm -f
Once complete, you should feel about 1.7 GB lighter for the full install.
The preference pane
To remove the old preference pane from System Preferences
If you instead installed the smaller package, or also added the extras,
use the same process once you obtain a toc from the files.
Now the upgrade
Out with the old and in with the new. The old cruft is gone and you can
install the new release. Happy $\TeX$-ing.
Disclaimer
This is the process I used to clean-up Mac$\TeX$ 2011. Use it at your own
risk. This procedure is provided AS-IS and without warranty of any
kind. In no event will I be liable for any damages arising out of the
use or inability to use this process. For example, if it causes wild
flying monkeys to burst from your bum, proceed to rend your citadel
down around your ears, put your old floppy disk into your toaster and
use it to set fire to the detritus of your keep and salt the very earth,
all while you watch from the last remaining parapet: your problem, not
mine.
In a recent post, I wanted to add a zebra table ([1],[2])
via the CSS3 tr:nth-child selectors, see
StackOverflow. But the default Octopress markdown drove me
crazy by wrapping everything in <p></p> which killed my
<style> attempts. A quick glance at the
markdown syntax doc suggested I could use <div> to
get around this.
An example
It is useful to define the style locally since a global definition
may not fit all circumstances. In the style below, we define a the
table class ztab1 along with a few other style elements to
dress up the table.
Using the ztab1 table class defined above allows us to
input raw HTML table to produce
Counter
Animal
Collective Name
1
apes
shrewdness
2
bees
grist
3
mules
rake
4
owls
parliament
The first column entries are centered by
Center first column entry
1
<tdstyle="text-align: center;">1</td>
Conclusion
using a <div> tag wrapper prevents the default Octopress
markdown from eating <style> definitions. However a
better solution would be to change the markdown parser, as suggested by
Chico and Aral Balkan.
Recently, as an educational experience, and a place to share lessons
learned, I decided to setup this Octopress blog
hosted via GitHub.
Configuration
While I have a Linux server at home, I do most of my work from my
Early 2008 MacBook. Since I am a conditions to and a fan of the
GNU tools, I use
Macports to manage them and other useful
tools. You will need a compiler, git, ruby, bash shell, and a terminal.
The following table summarizes my the various items I happen to have
installed.
Description
Provider
Version
Xcode
Apple
4.4.1, build version 4F1003
CLI tools, llvm-gcc
Apple
4.2.1, LLVM build 2336.11.00
gcc
MacPorts
4.5.4, MacPorts gcc45 4.5.4_1
clang
Apple
4.0, LLVM 3.1svn
ruby
Apple
1.8.7, 2011-12-28 patchlevel 357
keychain
MacPorts
2.7.1_1
git
Apple
1.7.9.6, Apple Git-31.1
git
MacPorts
1.7.11.5
bash
Apple
3.2.48(1)
Terminal.app
Apple
2.2.3, 303.2
Setup and pitfalls
In addition to the Octopress documentation, there are many
excellent guides to setting up Octopress hosted via GitHub, e.g.,
Studying these guides closely provided the outline for setting up my
particularly instance.
Most of my difficulty came from order of operations. I looked at the
instructions, and presumed I knew better, but order was important. So,
I present the following items in the order that finally worked for me.
If you are CLI-shy, try GitHub for Mac. There are several other
Mac GUI options, e.g. GitX or
SourceTree. GitX is flexible and works
well enough, particularly to visualize branching. SourceTree certainly
looks glossy, however I have only toyed with it because I’m not a huge
fan of Atlassian.
Getting the right Ruby
Octopress requires Ruby v1.9.3+. There are a number of ways to get to
v1.9.3 on the Mac: MacPorts, Ruby Version Manager (RVM), rbenv.
Upgrading the Apple native v1.8.x is highly discouraged. Believe me.
I know. I tried it, and it was painful undoing what I did.
Ruby Version Manager
RVM seemed the best choice for me. Being so tired after recovering my
native Ruby, I thought I could simply
Bad install of RVM
1
$ sudo gem install rvm
but after some issues, I uninstalled it from the native ruby environment
and followed the processes suggested on the RVM quick install guide
Better install of RVM
1
curl -L https://get.rvm.io | bash -s stable
The first try, it failed with the error:
Install error message
1
You requested building with 'gcc-4.2' but it is not in your path.
and I discovered I had a CC environment variable set that pointed
elsewhere. So an unset CC and rm -rf ~/.rvm, then the install again
was successful, however it warned me
Another install error message
123
RVM is not a function, selecting rubies with 'rvm use ...' will not work.
You need to change your terminal settings to allow shell login.
Please visit https://rvm.io/workflow/screen/ for example.
After checking the link, it all seemed unnecessarily complicated, but I
did verify the warning:
Is rvm a function?
12
$ type rvm | head -n1
 -bash: type: rvm: not found.
things look good. Simply adding it to your .bash_profile ensures it
will be loaded each time you do login.
My rvm install had already installed Ruby 1.9.3 selected selected it
as the default, however you can verify and ensure this by
Ruby version check
12345
$ ruby --version
ruby 1.9.3p194 (2012-04-20 revision 35410)[x86_64-darwin11.4.0]$ rvm use 1.9.3
Using /Users/username/.rvm/gems/ruby-1.9.3-p194
Running /Users/username/.rvm/hooks/after_use
GitHub
First, as mentioned in all guides, sign up for a free GitHub account, and then create a repository
for as indicated for User Pages.
The repository naming scheme is username/username.github.com. There
is no need to add anything to the repository, GitHub will recommend
adding a README.
I have yet to setup a custom domain, but a portion of the process is
described
here.
which will installed a number of items. Once complete, we can setup the
default classic theme with
1
$ rake install
This repo will hold both your content and the Octopress code. To update
Octopress, see the Updating Octopress guide.
Connecting Octopress to GitHub
The Deploying Octopress to GitHub Pages
instructions clearly outline how to accomplish this. In summary, from
the top of the octopress.git repo
Connect repo to GitHub Page
1
$ rake setup_github_pages
answering the questions as required, i.e., repo url is
git@github.com:username/username.github.com.git. Then,
Generate pages and publish to GitHub Pages
12
$ rake generate # generate the content from markdown$ rake deploy # copy the content to be deployed
Commit and push your changes
Commit changes
123
$ git add .
$ git commit -am 'initial import'# a very poor commit message :($ git push origin source
The last line pushes source to the master branch of your GitHub repo.
Waiting …
Lastly comes the waiting. GitHub recommends about 10 minutes. My
experience is that it take 1-5 min to receive the e-mail that the
page(s) have been created, and 10-15 min for the site to appear
initially. Afterwards, content appears much more quickly, at the 1-5
min range.
Blogging
Finally, you are ready to generate content. The Octopress Blogging Basics page enumerate the helper
functions and process to get your content to your GitHub repo.
So far, I have found the rake preview version useful. In one
Terminal.app tab, I invoke
Start preview on localhost
1
$ rake preview # start local web server
while in another, invoke
Start change watcher for localhost
1
$ rake watch # auto-regen on change
while editing markdown in a third. I verify my blog changes
via browser on localhost:port. The port will be
listed on one of the first few INFO lines after preview startup
Finding the localhost port
1234
$ rake preview
[2012-09-08 21:53:52] INFO WEBrick 1.3.1
[2012-09-08 21:53:52] INFO ruby 1.9.3 (2012-04-20)[x86_64-darwin11.4.0][2012-09-08 21:53:52] INFO WEBrick::HTTPServer#start: pid=77869 port=4000
and voilà, we see port=4000, so http://localhost:4000 should
do it.
Conclusion
This was a straightforward process, once I thought more carefully about
order of operations. I also, unfortunately, messed up my repo to start
due to a typo, which caused my source to push to a source branch in
GitHub, rather than master. This caused me no end of heartache as I
waited for my pages to be created, but of course they weren’t because
there was no master branch. After a few repo deletes, and typing
correctly, it finally worked. Personally, I hope you have less trouble.